
Most writers on the Internet gives the advice to take the screenshot using external software. That’s ludicrous for me. Most Windows users didn’t know that they don’t need any External support to take the screenshot in Windows 7, 8, 8.1, 10 Version. Microsoft has implemented a Screenshot Tool for its users during its development period. It’s called the Snipping Tool. With the help of this tool, you can take a Screenshot in seconds. Also, in the latest Windows 10, Microsoft has added an inbuilt function to take a screenshot at any moment. So, take a breath and say goodbye to all the Screenshot software that slow-downs your Computer/Laptop.
In this article, I will go straight and explain to you how to take screenshots in Windows without using any external Programs.
But before, I want you to know about the snipping tool. So, let me first explain it to give you some ideas about that.
Contents:
What is the Snipping Tool?
It is a free tool that comes Preloaded in Windows 7, 8, 8.1 and 10. Using the Snipping Tool, you can capture any part of your Windows Screen. Also, it allows editing the Screen taken Photo that provides more juice to it.
In this tool, you can also do tons of other customizations like you can specify your Screen size in the free-form snip, Rectangular Snip, Windows Snip, full-screen snip, etc.
You can also play more in Snipping tool options. There are two Sections; Application and Selection.
Application section Includes:
- Hide Instruction text.
- Always Copy snips to the clipboard.
- Include URL below snips (HTML Only).
- Prompt to save snips before exiting.
- Show screen overlay when Snipping Tool is active.
These are the following options are available to access under the Application section. Now let’s see what’s under the Selection section.
Selection Section includes:
- Ink Color; Red, Black, Maroon, Green, Olive, Navy, Purple, Teal, Grey, Silver, Lime, Yellow, Blue, Fuschia, White, and Aqua.
- Show Selection ink after snips are captured.
These two options are only available under the Selection section.
I understand for new users it is hard to explore all the things inside the Snipping tool. And that’s why I explained here for you to just walk. For newbies, the snipping tool also has added a little shortcode that appears at the start that explains how to operate it. You can read that and navigate for taking screenshots.
Must Read: How to Disable Browser Plugin like in Chrome, Internet Explorer, Firefox
Take Screenshots Using Snipping Tool of Windows
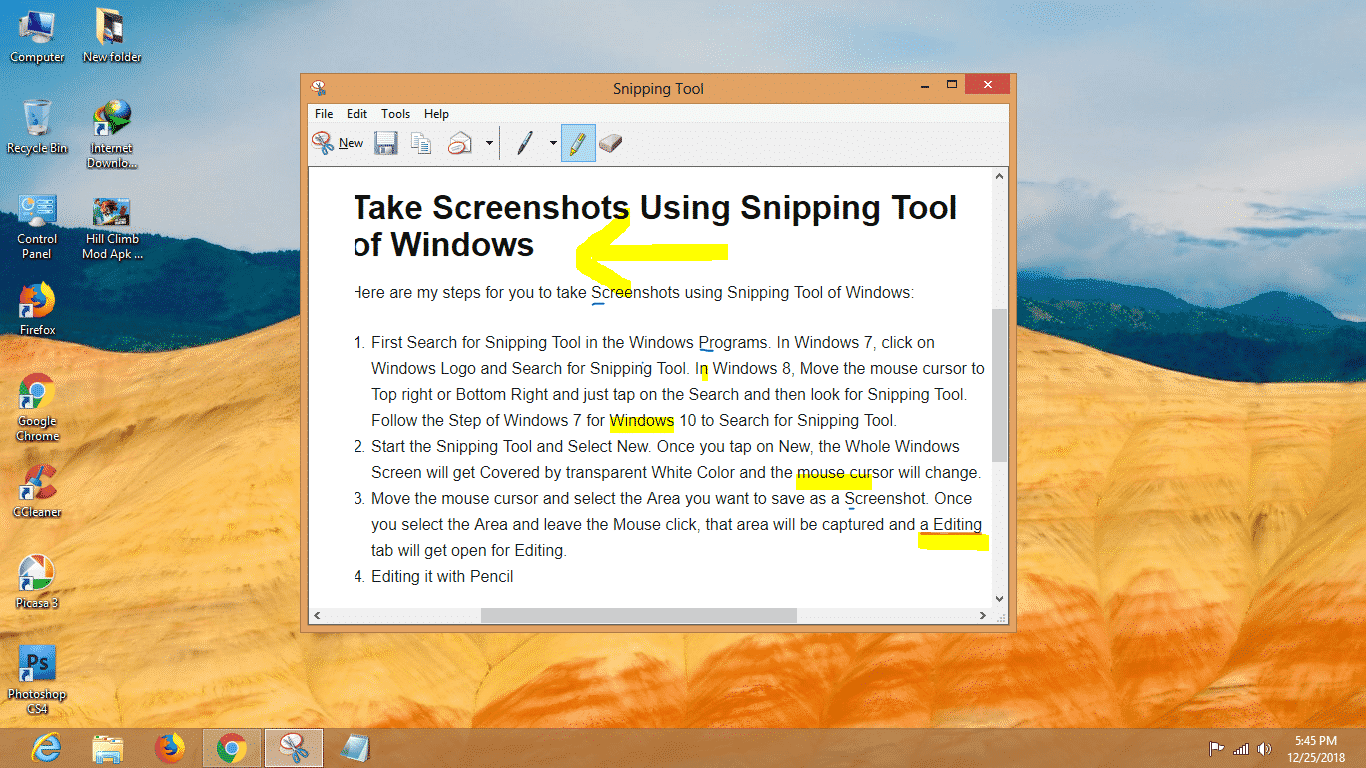
Here are my steps for you to take Screenshots using Snipping Tool of Windows:
- First Search for Snipping Tool in the Windows Programs. In Windows 7, click on Windows Logo and Search for Snipping Tool. In Windows 8, Move the mouse cursor to Top right or Bottom Right and just tap on the Search and then look for Snipping Tool. Follow the Step of Windows 7 for Windows 10 to Search for Snipping Tool.
- Start the Snipping Tool and Select New. Once you tap on New, the Whole Windows Screen will get Covered by transparent White Color and the mouse cursor will change.
- Move the mouse cursor and select the Area you want to save as a Screenshot. Once you select the Area and leave the Mouse click, that area will be captured and an Editing tab will get open for Editing.
- Edit the Screenshot with Pen or Do things Highlight if you want. Like, Draw a Sign to highlight the proper area or button. Use the Highlighter to Highlight texts and stuff like that.

- Once you have done with editing, save it by clicking on the Save Snip icon. OR You can also save from File>Save as>Name it>Final Click.
- Done.
Following these steps will lead you to successfully capture Screenshot using Snipping Tool.
Let me show you another trick that required No software, No default Program. It’s by using a combination of keys.
Every Windows (Upper than Windows XP) is now capable of taking screenshots with the help of keyword keys or keys. So, now let me show you how you can take Screenshot using keys combination that required no software.
Read Also: 10 Best Tips to Run Windows Faster in 2018
Take Screenshot using Combination Keys in Windows 7, 8, 8.1 and 10
I got learned a bunch of keys combination that helps to Take Screenshots in Windows. Some key combinations may not work for some Users because New Windows has a different key and unique key combination set for taking screenshots.
Considering the various Windows, I have found the keys that work in all Windows like 7, 8, 8.1 and 10. Now let me show you some key combinations that instantly capture the Windows screen.
Key Combinations for taking screenshots in Windows
- Press “Windows logo key + Print Screen SysRq“. This key combination is very common and almost works in all the Windows-like 7, 8, 8.1, 10, etc. Windows logo key is easy to find on the Keyboard but Print Screen SysRq (Also known as PrtScn) is Hard. This button is mostly found between F12 and Scroll Lock. It is exactly there! Whenever you want to take a screenshot of any Window, just Press it combined or the same time. You may not see any movement or action because of the No Animation enabled in Windows. The Screenshots will be saved in Pictures with separate Name “Screenshots”.
- Use “Windows logo key + Ctrl + Print Screen SysRq (PrtScn)”. If you were unfortunately unable to take a screenshot using our first key combination then this will definitely work. In most laptops, it works 99.9% and the key combination I suggested is separately for Laptop users. Because of the amount of Laptop users complain about having no guide of taking a screenshot in their machines is more than desktop users. If the First didn’t work for you, take heart and try this one. The picture taken may not be observed because of Off Animation. Also, the Screenshot image will be saved in Pictures.
- Try “Windows + Shift + S” to take a screenshot of any part of your Windows screen. When you press that Key Combo, the whole Windows screen will get grayed and the mouse cursor will get convert into select cursor which allows selecting areas on the screen. Now move your cursor and select any part of the screen. In seconds, the screenshot will be saved under Pictures. This key may not work in Windows 7, 8, 8.1. This means it only works in Windows 10.
Most of these will work on your Laptop and Desktop that has Windows Installed.
Read More: How to Make PC and Laptop Actually Run Faster
Conclusion
If you are using Windows like 7, 8 and 10. It’s not necessary that you must need external programs to take a screenshot. Windows has its own tool like Snipping Tool that allows Good amount of features for taking screenshots.
If this program doesn’t suit your needs, you can try different key combinations to take a Screenshot in your Windows. I have just listed 3 keys combination because I have found that they work 90% in most machines.
If you are using Windows 10 then you can take advance of Game Bar and more combination keys to take screenshots. It has more options for taking a screenshot in Windows.
So, I highly recommend you not invest money to purchase software that builds for taking screenshots because Windows itself have enough capabilities.
Hopefully, you got learned something new? If so, please share this article and comment if you still have any queries. I will get back to you in 5 minutes.