Best BlueStacks Settings: It is a great software to enjoy mobile games on a PC. And it is also one of the best Android Emulators for PC as well. But one bad setting in BlueStacks can ruin your gaming experience in the first place. You know why? Because of robust software, it’s an engine that needs decent specs to run on any PC and that’s why you should customize BlueStacks for the best gaming. And if you don’t do that, the lag can kill your gaming. So, in today’s post, I will show you some settings that will ensure great BlueStack performance on any PC.
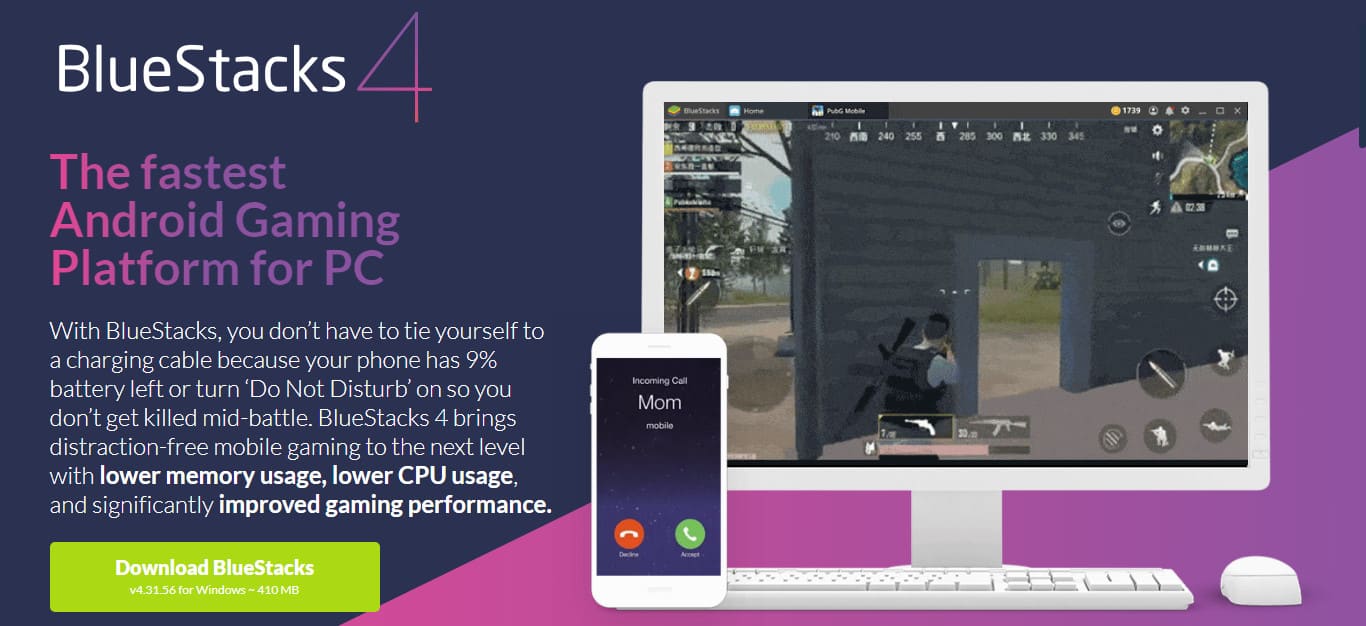
Before getting to those best settings, I want you to know some features of the latest BlueStacks 4 which has recently released for PC. And I will also explain to you why you should use BlueStacks 4 instead of any older version. So, let’s get started.
Contents:
What’s New in BlueStacks 4?
According to the official BlueStacks blog, it is 6x faster than Samsung Galaxy S9+, and also, it is more simple than any Android emulator out there.
If I break down the new features of BlueStacks 4 then it will be around 5 New features. So, here are the 5 best features of BlueStacks 4:
- High Performance Like Never before.
- Simpler UI.
- New and Improved Key Mapping.
- BlueStacks Multi-instance.
- BlueStacks Store and BlueStacks Points.
Now let me briefly explain these!
1. High Performance
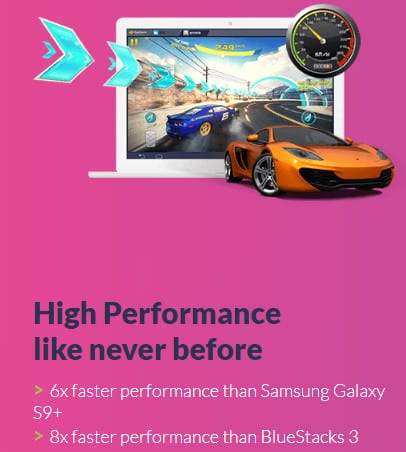
In BlueStacks 4, the performance level has increased more than 8% than BlueStack 3 which was the previous version of BlueStacks 4. Also, the performance of BlueStacks 4 is 6x faster than Samsung galaxy s9+ which is the best high-end device in 2018. Meanwhile, the performance of BlueStacks 4 is better than any Android device available right now. And it also becoming more compatible with PCs.
While playing PUBG (the most popular shooting game of all the time) on BlueStacks 4, the performance doesn’t degrade. But if you play the PUBG PC version on your computer or laptop with decent specs then it will definitely lag. Here, I’m not saying that PUBG Mobile and PUBG PC is the same, I’m just saying that you will be able to enjoy Android games better on PC with the help of BlueStacks than on any Android phone.
Read it too: How to Boost the Gaming Performance of PC and Laptop
2. Simpler UI
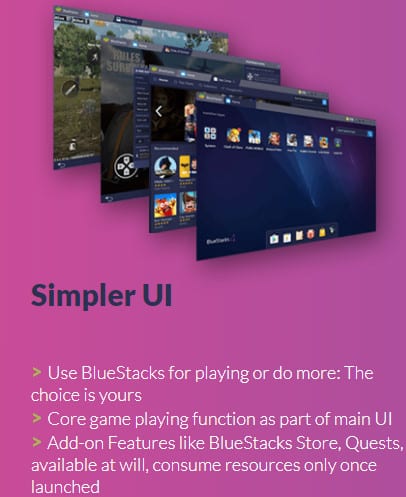
The UI in BlueStacks 4 is as simple as reading books in a known language. And this simplicity makes BlueStacks 4 suitable for everybody. With simpler UI you can play more and do more easily. This means playing games with the simpler UI of BlueStacks 4 is not hard anymore. You can play any High-end games like PUBG Mobile or COD Mobile with BlueStacks 4 because the simpler UI is now part of the core playing function.
Moreover, Add-on features are available like BlueStacks Store, Quests, available at will, etc. They consume resources only when launched.
3. New and Improved Key Mapping
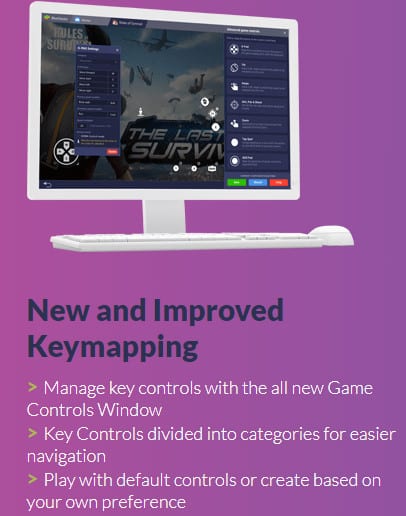
BlueStacks 4 has a well-improved Keymapping function. All the controls are now truly in your hands. Controlling Android games with BlueStack 4 has improved now. And you can customize your own controls for a particular game and it’s all because of the new and improved key mapping function.
The key mapping on BlueStacks 4 is categorized in a user-friendly way. This means you can easily navigate through without any issue. This new key mapping function is now available for all the new games regardless of their genre. This means you can also customize your new COD Mobile controls easily on BlueStacks 4.
4. BlueStacks Multi-Instance
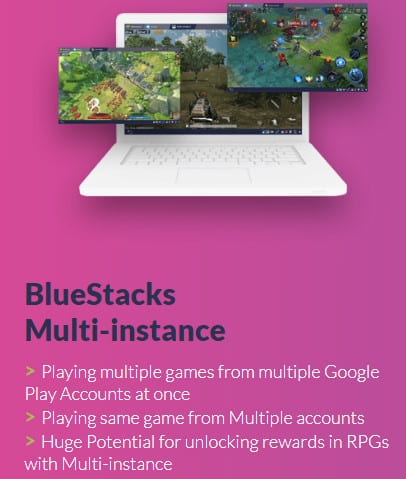
Multi-instance of BlueStacks 4 allows playing multiple games at the same time. And to do that, you need to have multiple Google accounts on your BlueStacks 4. Even you can play the same game with multiple accounts. It’s just best for two brothers who love one particular game but don’t have two separate devices to play. Multi-instance is a really good feature for the Solo brothers. And it also has the capability to improve RPG’s game unlocking rewards. It is really a good feature for gamers who love RPG games.
5. Earn Points and Get Free Gift
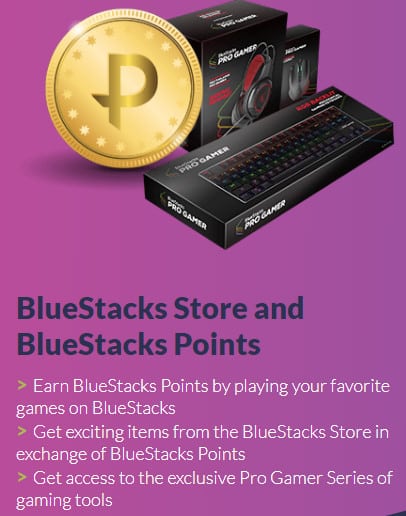
Love achieving targets in games? Earn points and get a free gift is a big feature for those who are looking to get the reward of their hard time spent on gaming. You can get rewards by exchanging your points with gifts. These exchanges can be done using the Bluestacks store. You just have to visit the BlueStacks Store, make an account, and exchange your points with rewards. All the gifts that are listed on the BlueStacks store have points mentioned. So, when you reach that exchange points, make sure to check out your reward.
This is something interesting in BlueStacks that everyone should try. It’s really offering a valuable deal. Just play the game, earn points, and check out your rewards. That’s it. And with this feature, you don’t have to worry about your gadget for gaming. Because you will earn it by just playing the Android games on BlueStacks 4.
So, these are some good new features that BlueStacks 4 have. Now, you may be thinking about how to download and install it on your PC. Right?
If so, then let me guide you on it because there are some critical things that you gonna face on the way.
Read it too: 3 Best Ways to Play PUBG Mobile On PC Without Any Lag
How to Download and Install BlueStacks 4 Latest Version on PC
Downloading BlueStacks latest version is very easy and you can do that in seconds. So, here is the step-by-step process to download BlueStacks on PC or Laptop 2021:
- Visit the BlueStacks official website. Do you know that BlueStacks has its own official site that contained a huge amount of information about it? Okk! If you do so, from there you can take any knowledge about it.
- Look for the download button and click on it. It usually found on the top or sometimes in the middle. It shifts often so, make sure you look everywhere on the page for the Download button.
- Click on the final Download button and catch the file. This is the final action you have to make to get the BlueStacks installation file. After you catch it in your browser, just for 10 minutes to successfully download it.
- Before installing, make sure you have installed Microsoft NetFrame Worker on your PC or laptop. Microsoft NetFrame Worker is necessary for BlueStacks Android emulator to run on PC. It usually helps the BlueStacks engine to run properly and smoothly.
- Disconnect the internet connection and double click on the BlueStacks.exe file to install it. This is important because sometimes BlueStacks try to connect to its server to check the version. And if the version is low, it recommends getting the latest version. Well, this is very useful but not for all. It actually increases the CPU and RAM usage that immediately degrades the PC performance.
- Select the BlueStacks file destination carefully. BlueStacks is a very high-end software that requires a good amount of Space. And you can take advantage by selecting the disk on your computer that has the most amount of space. Later, it will help BlueStacks to install and run applications, games easily.
- Hit the install button and get the shortcuts on your desktop. This is the final step to completely install the BlueStacks on your PC. The complete process may take some time (it totally depends on the specs of your machine). You have to be quiet there and please don’t do other tasks in the background. Because sometimes the installation gets stuck in the middle or near to end. Also, doing other tasks while installing BlueStacks slows down the process of installation.
- Just click on the Finish button and end the installation process. Now you have done the full installation process in a proper way.
Now, you can play your best Android game on BlueStacks 4. But wait! The default settings are best for your PC or Laptop? Absolutely not!
Yes, in some PCs or laptops the default settings will be alright but not in all. So, how do you know which settings of BlueStacks are best for your PC or Laptop?
There is no way on the internet except here! I will give you every best setting of BlueStacks for your PC. How? Let me explain!
So, in the settings, there are numerous options to customize like display, engine, and more. But you only have to focus on two settings that I just mentioned in the previous line. Its display and engine.
Now, let me give you the Best Bluestacks settings for your PC or laptop.
Check Also: How to Install Phoenix OS on PC or Laptop and Play PUBG Mobile
Best BlueStacks Settings For Gaming On PC or Laptop 2021
Here are the best working BlueStacks settings for gaming on PC or Laptop 2021:
1. For Low-end PC Owners
I understand that having a Low-end PC is a disadvantage when it comes to gaming in BlueStacks 4. But in this world that we are living in has everything possible. So, the point is how you can play Android games using BlueStacks 4 on your Low-end PC? Well, this can be done by cutting the BlueStacks 4 features from its settings to optimize it for any PC. Basically, it offers multiple settings options that we can optimize to best suit our system.
Reduce Aspect Ratio from Display Settings
Reducing the screen size of BlueStacks 4 will deliver you more FPS that will help your PC run games smoother. Now you may think of a question that how you can know the Aspect Ratio for your Low-end PC. Well, after looking and experimenting on a ton of factors, I come to the end that BlueStacks at 640*480 screen ratio performs better. You can also play games on BlueStacks at the 1280*720 screen ratio. But it’s not better than the 640*480 screen ratio when it comes to performance.
So, now you know the best screen ratio for a Low-end PC. Now let me show you how you can change the BlueStacks display aspect ratio.
Method 1:
- Do right click on the BlueStacks icon.
- Select the properties.
- Go to the compatibility tab.
- Checkmark the “Run in 640*480 Screen Resolution“.

- Hit Apply and OK to save the setting.
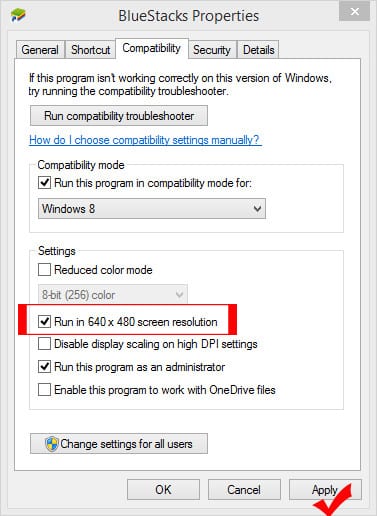
Now, you have successfully changed the screen resolution of BlueStacks 4 to the best screen ratio for a Low-end PC. If you feel the steps are a little hard to follow then you can continue reading for another method.
Method 2:
- Start the BlueStacks app player.
- Wait for the engine to start.
- Go to settings from Top right.
- In-display settings, choose a Custom size option and enter 640*480 size OR select 1280*720 screen resolution.

- Press “Enter” and restart the BlueStacks.
- Done.

This one is the simplest way to change the screen ratio of BlueStacks 4 to improve gaming performance. You can also reduce the DPI to 240 for the best performance. I highly recommend setting the DPI to Low. Remember, sometimes it is Un-changeable! So, try it also but at your own risk.
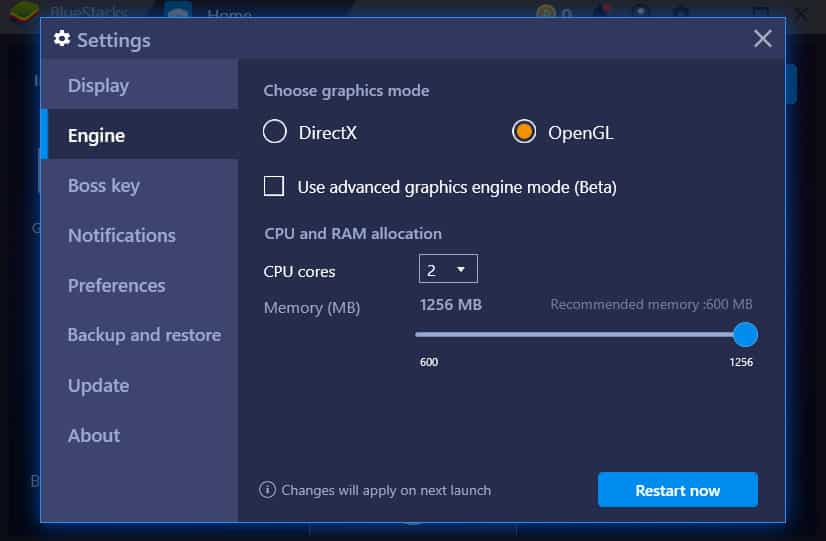
Optimize Engine
The Engine of BlueStacks is the most powerful engine ever built for Android gaming. It built for delivering good gaming performance and it is pre-optimized by default. But still, there are options in settings to improve it too. And you should take advantage of it for improving the gaming performance of BlueStacks 4 on your Low-end PC.
Again, I experimented with many settings with the Engine settings on my Low-end PC and the outcome is so fantastic. So, optimizing the engine will overall improve the gaming performance on your Low-end PC.
Basically, there are multiple factors that you should consider while playing with Engine settings. Reducing the usage or giving fewer specs access to the engine may lead to a BlueStacks crash. So, I recommend reducing it to medium or normal. In Engine settings, there are many new options like Graphics Mode, CPU, and RAM allocation.
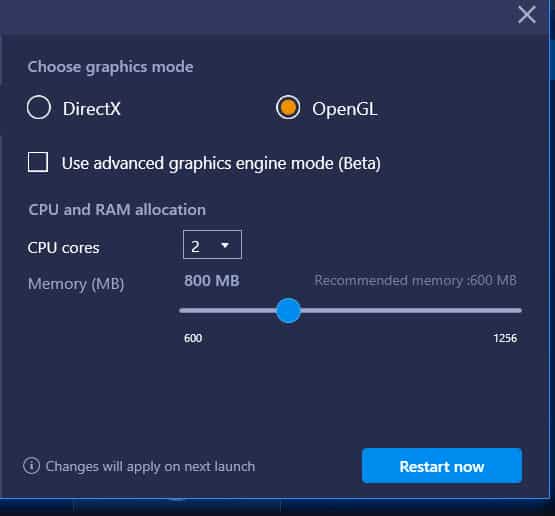
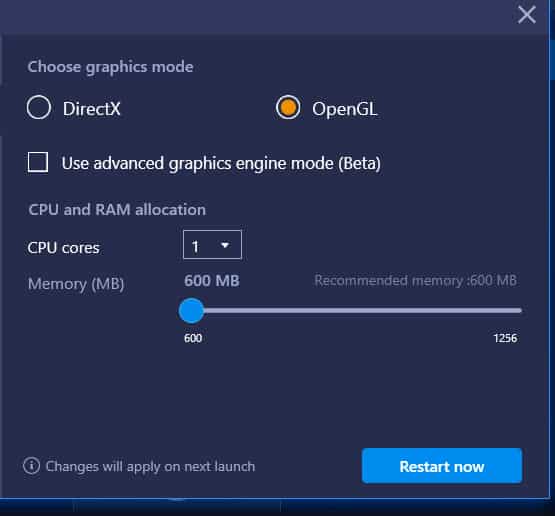
These three things can define the BlueStacks 4 performance on your PC or Laptop. So, If you have a Graphics card (integrated or external) then you can go with the OpenGL setting. But if you don’t any graphics then you should go with the DirectX setting. Now, assuming the graphics section is well clear to you. Isn’t it?
Now, you have to move to the CPU and RAM allocation section. In that section, if you have a dual-core processor with at least 2 GB of RAM then you should change settings to like this:
- Core usage: 2
- Memory: 800 MB
OR
If you have 1 CPU Core and 1 GB or 1.5 GB of RAM then you should change settings to like this:
- Memory: 600 MB
- Core Usage: 1
This will give your PC a boost in BlueStacks 4 and you will be able to play games like Subway Surfer and Temple Run. Not PUBG Mobile! To play PUBG Mobile, you should allow BlueStacks 4 to use at least 3 GB of RAM and 4 Cores.
Use these settings on your Low-end PC or laptop and you will see an instant boost while playing Android games on BlueStacks 4.
Now, let me give you the best settings for a High-end PC and Medium-end PC.
Read Also: Top 5 Best Game Booster For PC or Laptop
2. For High-end PC Owners (And Medium-End PC user)
High-end PC owners will face no issue even in default BlueStacks 4 settings because the specs are already good enough as per the recommendation specs of BlueStacks 4. But still, you can take advantage to improve the BlueStacks performance with its settings. Now, let me show you the best BlueStacks settings for your High-end PC and medium-end PC or laptop.
Display and Engine Settings for High-end PC
Changing the display and engine settings at best can increase the gaming performance on BlueStacks in your High-end PC. Here are the recommended Display and Engine settings.
Display:
- 1920*1080
- 1600*900
- 240DPI

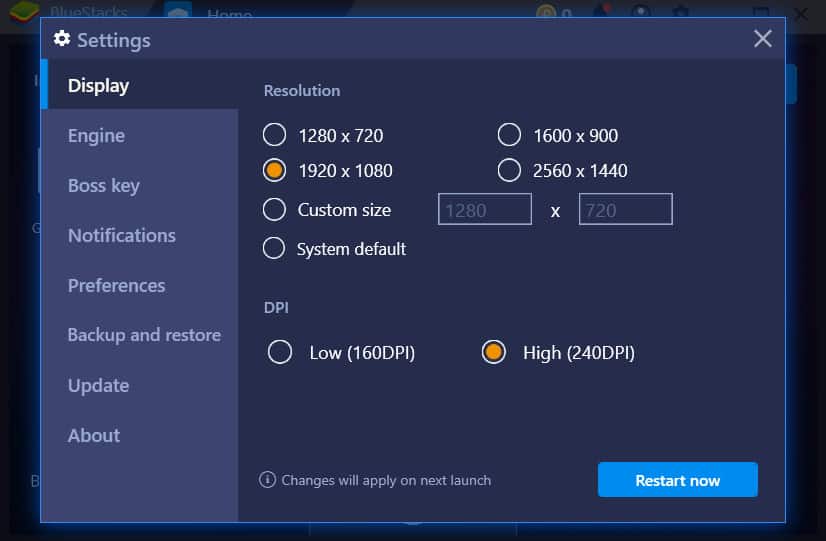
The above-mentioned screen size and DPI is the best display settings for a High-end PC.
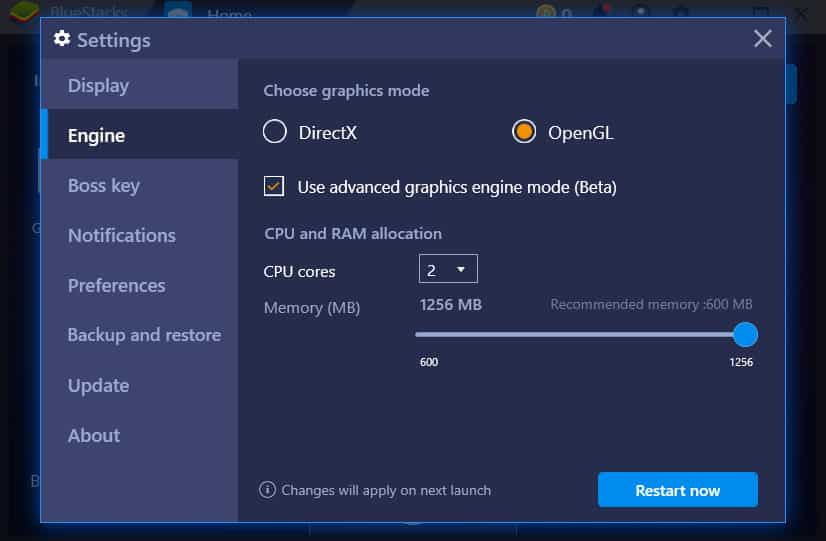
Engine:
- Use OpenGL instead of DirectX, if you have graphics on your Computer.
- You can also use advanced Graphics Engine mode for better gaming.
- Set CPU cores at 6 or higher if you have and set RAM allocation to 4 GB or Higher if you have more.
The above-suggested settings are the best working settings of BlueStacks for High-end PCs or Laptops.
These are the simple and best working settings you can do right now to enhance the BlueStacks 4 gaming performance on your High-end PC. Now, let me also show you the best settings for medium-end PCs or Laptops.
Display and Engine Settings for Medium-end PC
Medium-end PC or laptop owners can have at least faith to run any Android game that Low-end PC owners can’t have. Meaning, it will not be hard to Play Android games with BlueStacks 4 on a medium-end PC. But still, it will be better to save my recommended settings. Let me show you the best display and engine settings for a Medium-end PC or Laptop.
Display:
- 1280*720
- 240DPI
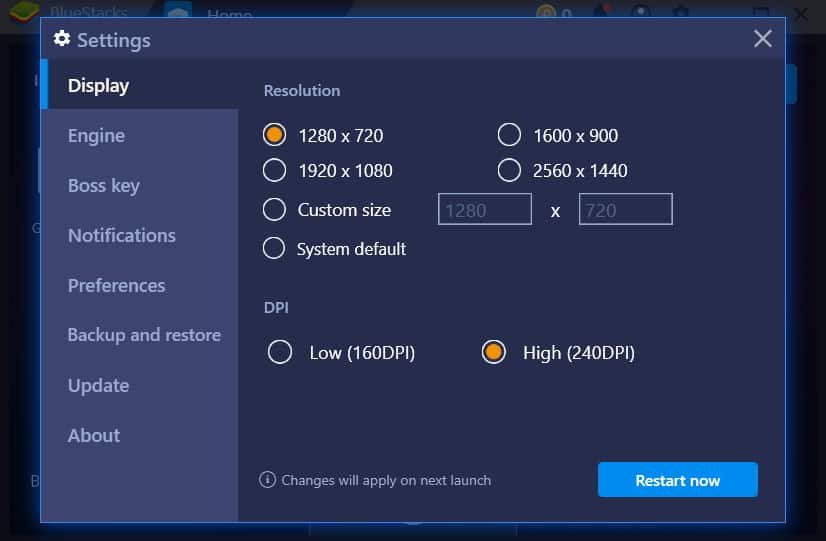
The above-mentioned display and DPI size is the best working screen size for BlueStacks 4. It can improve gaming performance at least 3x more.
Engine:
- Go for OpenGL, if you have graphics installed.
- Use 4 cores or more if you have.
- Set RAM allocation Memory to 3 GB or more if you have.
These engine settings are the best working settings for Medium-end PC or laptop users. You can also play with the settings on your own to test which setting works best for you.
Read More: Best Windows (XP, 7, 8, 8.1, 10) For Gaming?
Conclusion
Low-end PC or Laptop users should be willing to immediately change to the suggested settings for better gaming on BlueStacks 4.
High-end and medium-end PC owners should play in decent quality because they already have good specs that enough for handling BlueStacks 4. But still, you can do some tweaks and play with advanced graphics mode to enhance the performance.
Overall, the settings I suggested works perfectly and I tested the above settings in real. So, there is a strong chance that it will also work for all of you.
I hope you got learned something good about Android gaming on BlueStacks 4. If so, share this with your BlueStacks user friends and help them to maximize the BlueStacks performance for better gaming.
I have 4GB RAM and I think my laptop is dual-core. Can you please tell which category my laptop is? and which Bluestack setting is best for my laptop? I am waiting for your answer.
Also I have graphics installed.
For the dual-core processor, I recommend using Bluestacks with Medium settings. That will be optimal for your Laptop.
Thanks for your article and also for suggestion .
Your Welcome ;)
Thank you for the article Rohit. I like the simple pics so I can follow along.
Good job.
Michael
Glad you liked it!