
Are you getting too many emails from a particular Gmail account and want to get rid out of it? Well, there is a new Gmail feature that allows to Snooze emails in Gmail from Any particular Gmail accounts. And in today’s post, I will drive you through the process and also, solve many queries related to it. Because I understand when some people just want to irritate by sending emails in Gmail. So, let’s get started.
First, let me define what Snoozing means in Gmail so, you can understand and apply properly in a needed place. And then I will show you how you can actually snooze emails in Gmail.
Contents:
What are Snooze Emails in Gmail means?
If I’m right then you probably noticed a Gmail account holder that ever sent you emails and when you rejected their saying and offer. They start irritating you by continuously sending emails in your Gmail account.
And that’s the most irritating thing I ever tackled in my life (not actually). So, there is a solution?
Yes! It’s Snooze emails. It basically allows to stop the emails or snooze it for your requested time. You have every control in snoozing any emails. Like you can set time on how often you want to see a particular Gmail message after snoozing it, you can anytime immediately un-snooze it, etc.
That’s what snoozing an email means! Now let me show you how you can actually snooze email in Gmail.
Snooze Emails in Gmail and Stop Receiving Messages 2019
For PC Users
Here is the step-by-step guide to Snooze the emails in Gmail to stop receiving messages on PC:
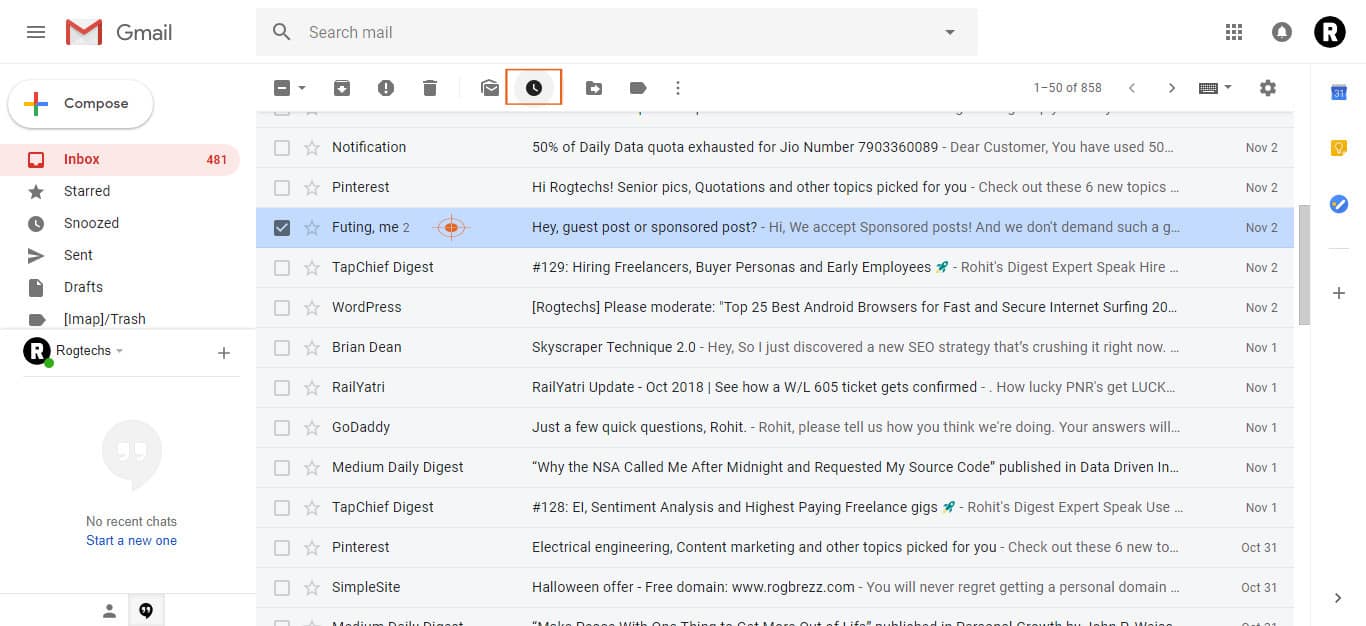
- Go to Gmail.com and Sign in with your Gmail account. When you want to snooze any emails, first you need to log in with your account in Gmail. So, you can access the various emails you have received.
- Select any emails you want to snooze. After getting back in your Gmail, look for the most irritating emails that you are receiving every morning and select it by giving a tick to the particular email in the box.
- Click on the Snooze button. When you successfully select the email, options for action will come at the top. Just look for the snooze icon by moving the mouse cursor and then click on it.
- Set the time to snooze. After finding and clicking on the snooze icon, you will get options to set times on how often you want to get emails back from the particular Gmail account. Just set the time according to you and finish the process.
- Done! After selecting the time to snooze, if the message shows (conversation is successfully snoozed) means you have correctly done the process.
This was a simple and straightforward process to snooze emails in Gmail. Now let me show you how to snooze email of Gmail in Android phones.
Read More: How to Remotely Access Computer Using Android Phone
For Android Users
Here is the easy step-by-step process to snooze any emails in Gmail:
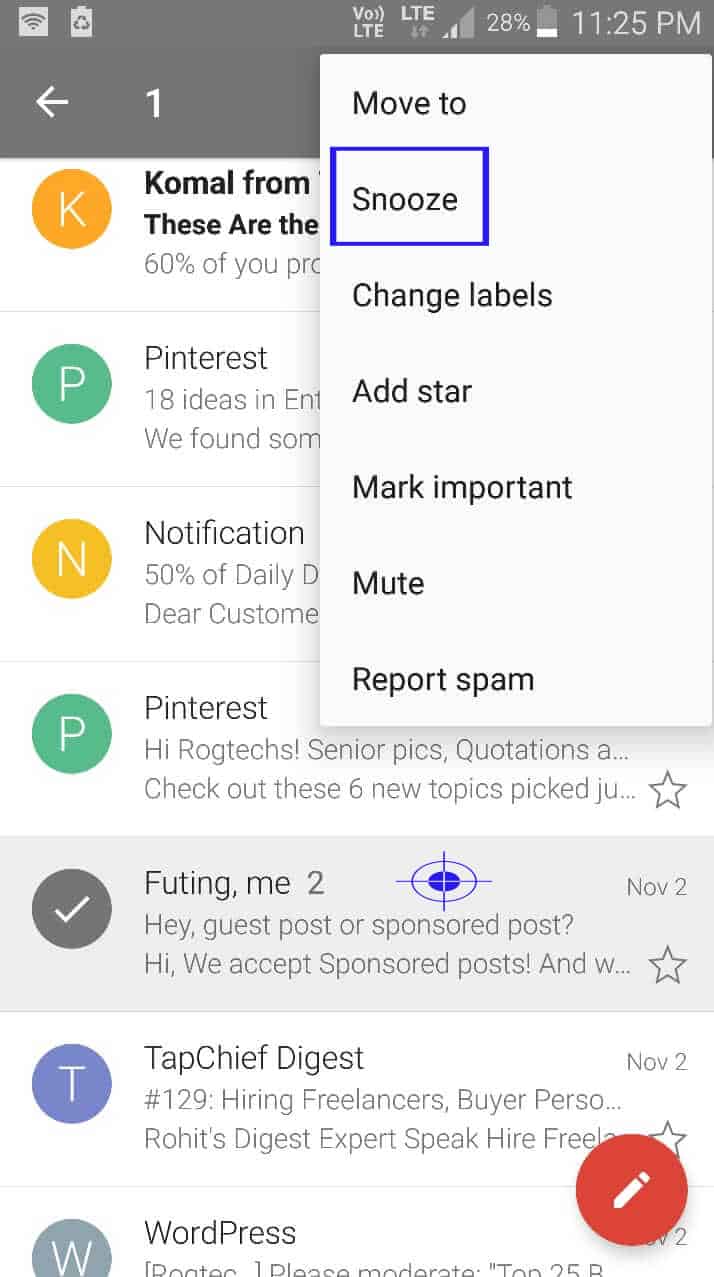
- Download and install the latest version of Gmail from the Google Play Store. To successfully snooze email in Gmail, you need to install or update Gmail to the latest version. Because the Snooze features work well when the Gmail app is updated. The best way to update Gmail is through the Google App Store. Because whenever the new version comes of an Android app, first get available there.
- Open the app with your Gmail account or log in. This is the second most important step you need to do correctly. Just log in with the Gmail that contains your frustrating Emails. So, snoozing can become easy for you.
- Tap and hold the email you want to Snooze and then click on the three dots from the right top. When you tap and hold any emails in Gmail, the action options come to follow. To get more options you need to unleash the three dots and you can do that by just clicking on it and after holding any email.
- Select the Snooze option and set the time for snoozing according to you. Just after selecting the snooze option, time settings for the snooze will flash on the screen. In that tab, you will get options like tomorrow, next week and pick date & time. Select the time like how often you want to see the particular email again.
- Done. Just after selecting the time, a message will flash in the bottom of the app saying the email is snoozed until X. If the message comes after snoozing email means you have done the process correctly.
So, that’s the simple process to snooze emails in Android Gmail. If after following my steps, the message and snooze don’t work then you have something wrong in your Gmail. Updating or reinstalling can fix this. Just try every step carefully for zero errors.
Read More: YouTube Time Watched Feature Shows How Many Hours You Watched
Conclusion
Knowing how to snooze emails in Gmail can help you to get out of such an irritating conversation. And you can let them realize that they just emailing for no reason and is your time killing.
Snoozing feature is important for all of us. Because we all have some bad times when keyboard worriers don’t stop irritating by sending emails.
So, hopefully, You got what you expected to read? If so, share this article and let people learn how to get out of an irritating conversation on Gmail.
Also, if you have any questions related to this article, please comment below. Because my writing and effort will be a waste of time if I didn’t help!